
Valentine’s Day Mason Jar Treats
Jennifer Cucci of Heavenly Cake Pops has been hard at work coming up with some fun Valentine’s Day ideas using her very cool Heavenly Cake Pop easy roller and our Mason jars. We love cake pops, and we really love how sweet they look in our jars! Get the ‘how to’ below.
How To Make Cupid’s Vault
What You Need
Box Cake Mix of your choice (Or your favorite recipe)
Milk Chocolate Candy Melts
Toothpick
Red Candy Melts
Small Candy Wrappers
Mini Easy Roller (optional)
Arrow Mold
Pink Candy Melts
Mason Jars
Lids
Heart Sticker
Red Paint
Gold Glitter
Ribbon
Glue
How To Make Cake Pops
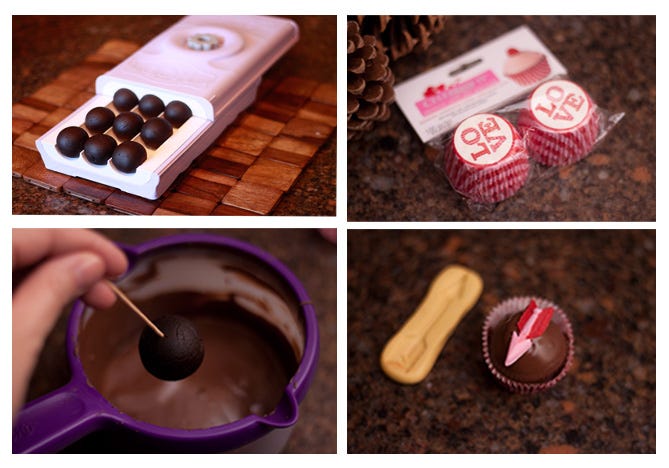
All Cake Pops start off with a baked cake, and these Cupid Cake Pops are no different! This can be store bought or your best recipe. Next you are going to crumble it down and knead those crumbs into a “Play-doh” like consistency. I always use my Food Processor to do this, but a mixer (with a paddle attachment) works just as well! It is much faster than doing it by hand and you will get more consistent results. Take a look at the steps it goes through in about 1 minute! First it will break down into fine crumbs, then they start to stick to each other and form a bit bigger of a crumb and finally if you leave it in long enough it will turn into a big ball of dough all by itself!
 Next you will roll all your cake dough into 1.25 inch balls (about the size of a ping pong ball). For faster, more consistent results, the Mini Easy Roller rolls 9 cake balls at a time and will allow you to fly through this step! Once you have finished rolling, place the cake balls into the fridge as you prepare your chocolate candy coating, it is always easier in my opinion to dip cake balls if you refrigerate them for a bit first.
Dip Them In Chocolate
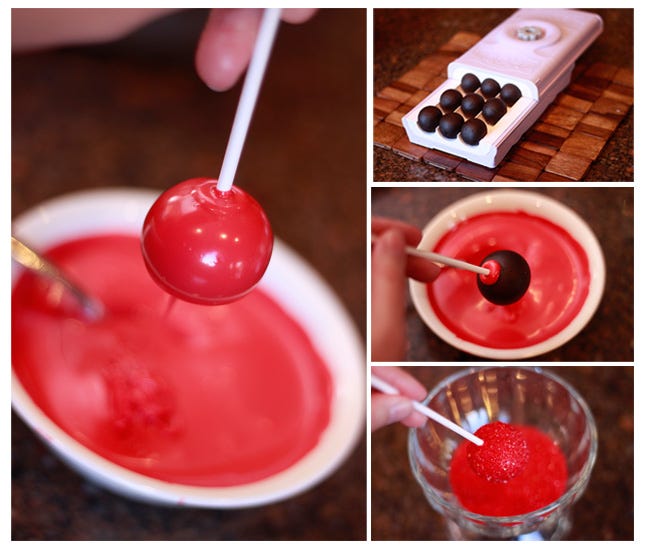
We used chocolate almond bark on this project and to melt it down we simply put it into the microwave on 50% power in 30 second increments and stir each time until it has a nice even flow to it. Since these cake balls will not be placed on a stick, we use a toothpick to dip the cake ball into the chocolate almond bark. Tap off any excess and place it into the candy wrapper to set. Twist out the toothpick and cover the hole with a little bit of chocolate (preferably before the chocolate sets so it all blends in as one coat). Next place the candy arrow right on top.
Decorating Fun
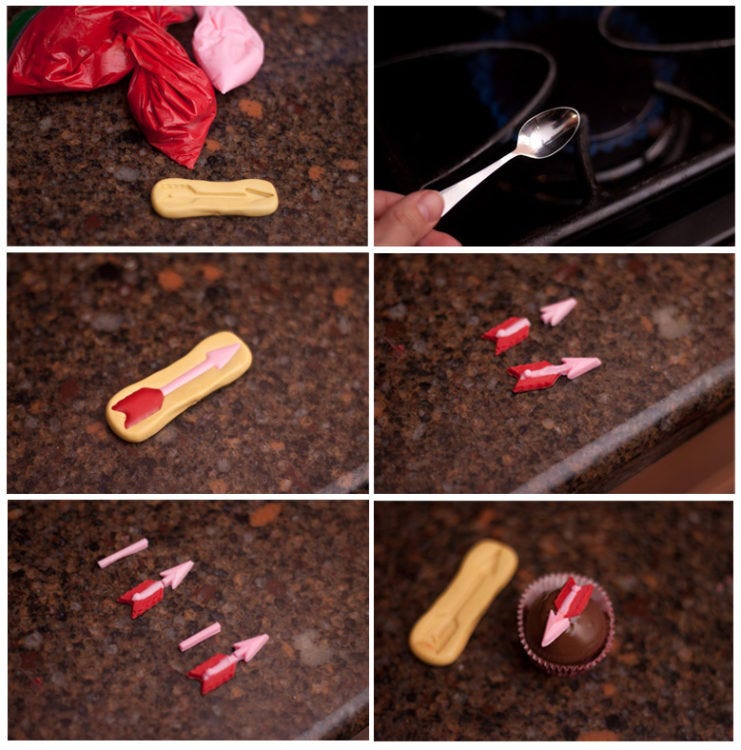
To make the candy arrow I used a candy mold (you can find this one at Lollicakes by Ella). I used pink and red candy melts to make the arrow. The only problem was the arrow was a bit too long for my cake pops and since I didn’t want them to break I needed to cut them down. After they set I broke them at both ends and discarded the middle portion of the arrow. I heated a spoon and touched both ends of the arrow and put them together to re-set. This the the small arrow I used.
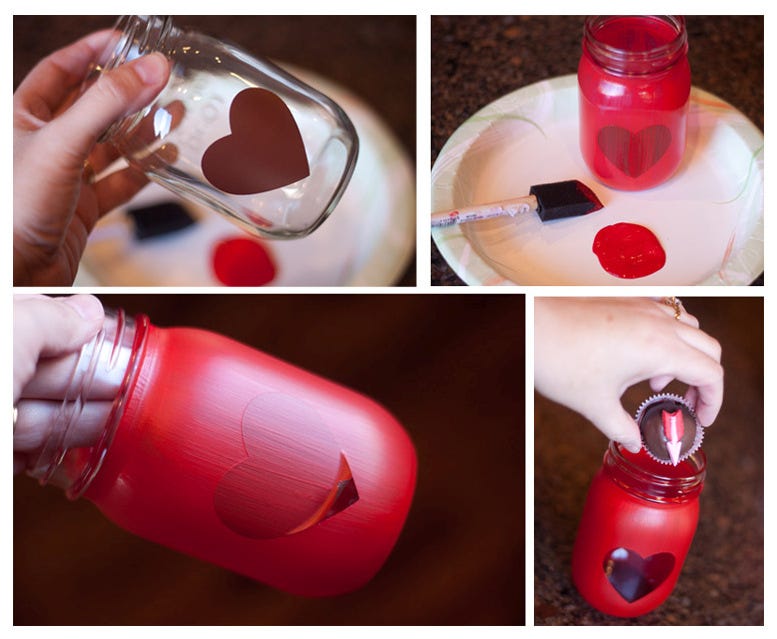
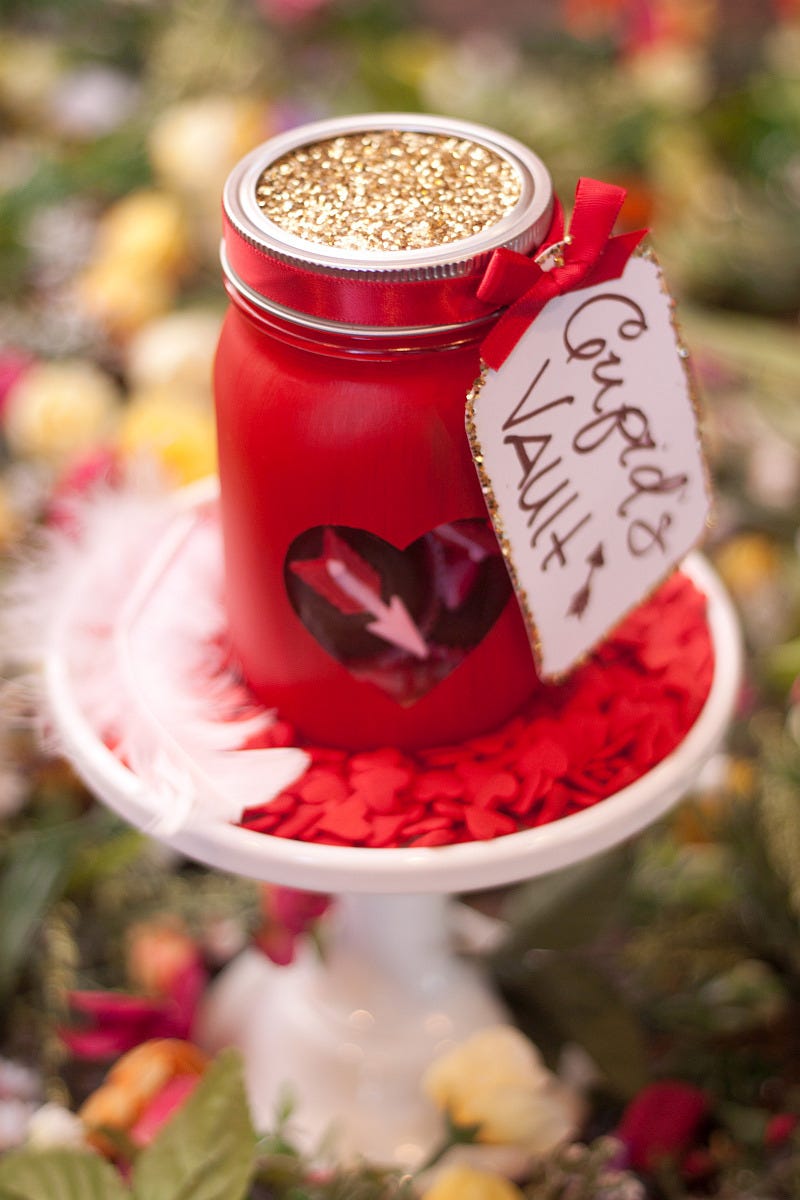
To decorate the Mason Jar, I cut a heart sticker from some scrap vinyl with the Cricut Explore™ (However any heart sticker will do) and placed it on the Mason Jar where I wanted the “window” to be. Next with Red Paint I painted the entire jar. About 3 coats. Once I was finished I pulled the heart sticker off, it is best to peel the sticker as soon as you are done painting. If you wait for it to dry make sure to use your fingernail or a thin sharp object to trace around the sticker to cut the paint free – so you don’t pull off the paint with the sticker! As soon as the paint is fully dry you can add your cake truffles!
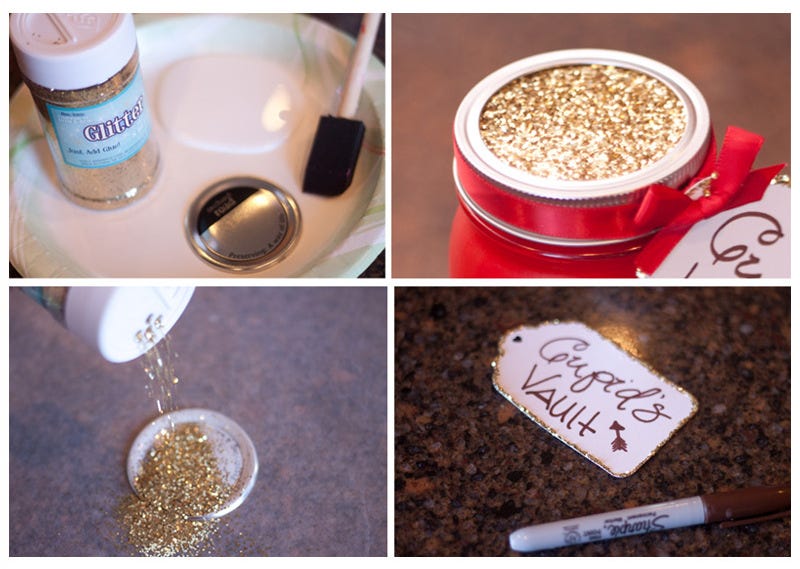
To decorate the lid I used regular school glue and gold sprinkles. Just paint the glue over the lid and sprinkle the glitter. Just make sure you do this over a piece of wax paper so that you don’t get glitter all over the place, (and of course I am speaking from experience)! Once that is dry, place it over top of the Mason Jar. Add your ribbon around the band and of course the Tag! If you wanted to skip this step, you could always top your jars with red or pink lids!
Cupid’s Vault is perfect for your Valentine or even fun as a teacher gift this year!
Crepe Paper Roses with Cake Pops
What You Need
Box Cake Mix of your choice (Or your favorite recipe)
Red Candy Melts
Red Sanding Sugar (optional)
6 inch Cake Pop Sticks
Mini Easy Roller (optional)
Red and Green HEAVY DUTY Crepe Paper
Green Floral Tape
Mason Jars
Lids
Scrap burlap (optional)
Glue dots (optional)
Accent silk flowers (optional)
Make Cake Balls
First, make your cake dough and roll your cake balls. Follow the directions above about how to make cake balls.
Dip Cake Balls in Candy Melt
Once you have finished rolling, place the cake balls into the fridge as you prepare your candy melts, it is always easier in my opinion to dip cake balls if you refrigerate them for a bit first.
We used red candy melts on this project and to melt them down we simply put them into the microwave on 50% power in 30 second increments and stir each time until the candy melt has a nice even flow to it. Next you will dip the 6 inch cake pop stick into the melted red candy melts and into the cake ball, this creates somewhat of a bond between the stick and the cake ball. Next dip the entire cake ball into the red candy melt and before the candy melt sets, roll in the red sanding sugar. If you don’t have sanding sugar you can skip this step, I use it as it adds a nice little sparkling effect and deepens the red color…plus it hides any dipping flaws!
Decorating Fun
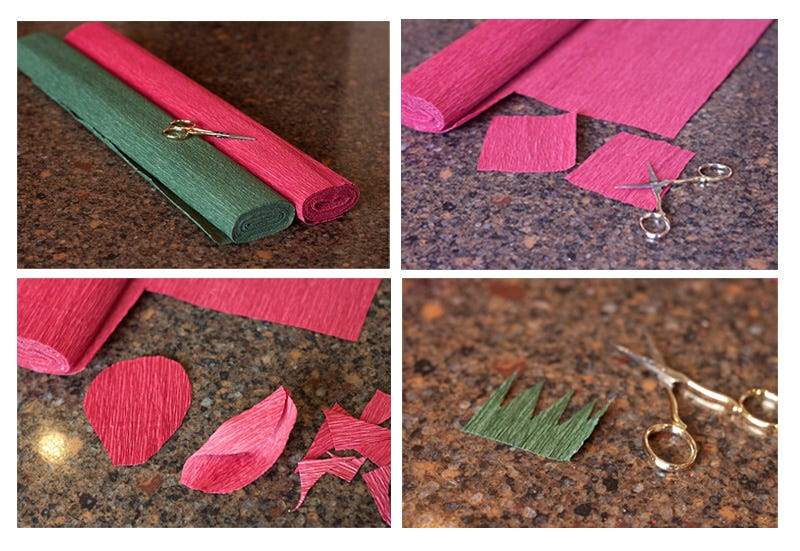
To prepare the crepe paper, (REMINDER: this is heavy duty crepe paper, as your normal “streamers” won’t have enough stretch), you will need to cut at least 2 approximately 6 inch tall by 3.5 inch wide rectangle. (This is per rose bud, so repeat as necessary). The “stretch” will be the wide part. Next gather both pieces and round out the top and cut a more narrow base. Next you will just need to cut a small piece out of the green, approximately a 1 inch square. Cut “Vs” all the way across.
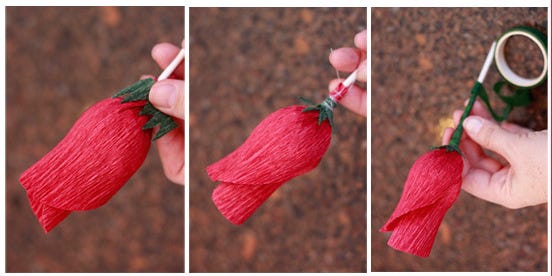
 Now that your paper is prepared, take your finished cake pops and 2 of the petal shapes from the crepe paper. Give the Crepe Paper a little stretch in the center, so your cake ball will fit, cupped inside. Now take the second piece and repeat, only fit it on the opposite side. Now take a length of string and wrap it tightly around the base, securing these two petals.
![Crepe Roses-4[1]](https://www.fillmorecontainer.com/blog/wp-content/uploads/2016/01/Crepe-Roses-41.jpg)
Now it is time to attach the green Crepe Paper. Place it just over the string and when you have it in place tie it into place by wrapping another length of string. Secure it with the green floral tape and tape down the stick starting at the base of the bud covering the string.
Now place all your finished roses into your Mason jar fitted with a strip of burlap secured by glue dots. I also mixed in a few pieces of small silk flowers.
Need more Valentine’s Day ideas? Check out these blog posts, or visit our Pinterest board.


0 Comments